Have you ever wondered how to add instant charm and sophistication to your home with just a simple wall update? Panelled walls have become a go-to design choice because they effortlessly blend timeless elegance with modern flair, transforming ordinary spaces into extraordinary retreats. Their versatility means you can achieve everything from cozy, rustic vibes to sleek, contemporary looks—making them a popular option for homeowners eager to elevate their interior style.
In this article, you’ll find a treasure trove of inspiring ideas and practical tips for incorporating panelled walls into every room of your home. Whether you love classic shiplap, bold geometric patterns, or innovative lighting effects, there’s something here to spark your creativity.
Get ready to explore a variety of styles, finishes, and creative twists that will help you craft stunning feature walls and elevate your home’s overall aesthetic with confidence and flair. Transform your space with timeless shiplap paneling that instantly evokes a seaside cottage vibe.
This style features horizontal wooden planks with tiny gaps in between, creating a charming, textured backdrop that brightens any room. The natural wood tones—whether painted white, soft gray, or left in their warm, raw state—add warmth and a relaxed, inviting atmosphere.
Imagine walking into a sunlit living room where white-painted shiplap walls reflect the natural light, giving the space an airy and fresh feel. The smooth, evenly spaced planks contrast beautifully with plush throw pillows and a cozy, woven rug.
The tactile experience of the slightly beveled wood surface, combined with the subtle scent of pine or cedar, makes the room feel both calming and rustic. This design is perfect for creating a relaxed coastal retreat or adding a touch of vintage charm.
Getting started is straightforward: measure your wall area and purchase pre-cut shiplap panels or tongue-and-groove planks. For a quick DIY project, use nails or adhesive to secure the panels horizontally, ensuring even spacing.
You can paint or stain the wood beforehand for your desired look—white for a clean, beachy vibe, or a darker stain for rustic warmth. Finish with caulk to fill any gaps for a polished appearance. With basic tools and patience, you’ll have a stunning, textured feature wall in no time.
1. Geometric Wainscoting for Architectural Interest
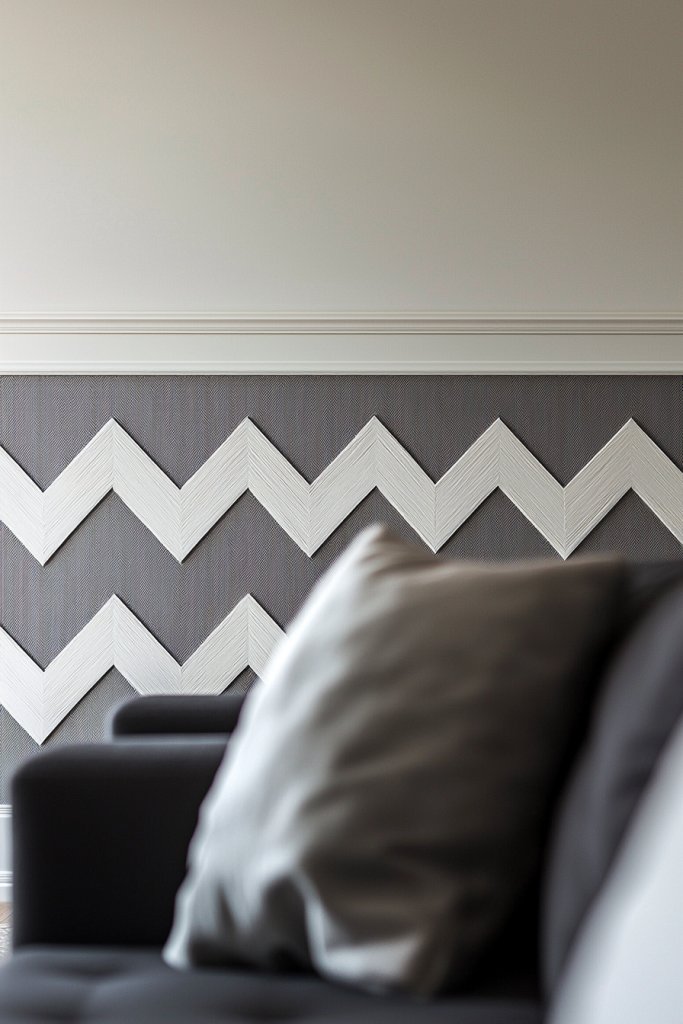
Inject personality and visual intrigue into your walls with bold geometric wainscoting patterns. Instead of traditional rectangular panels, this style features sharp angles, triangles, or chevron designs that turn a simple wall into a piece of art.
It’s perfect for adding a modern or eclectic twist to classic interiors. Envision a living room where the lower half of the wall is decorated with a striking zigzag pattern in contrasting shades of gray and white.
The geometric shapes create a dynamic rhythm that draws the eye and breaks up the space’s visual monotony. The textured paint or paneling provides tactile interest, while the crisp lines and sharp angles evoke a sense of sophistication.
This design can define a space, making a plain wall a captivating focal point. For implementation, start with mDF or plywood panels cut into your chosen geometric shapes.
Use painter’s tape and primer to create clean lines, then paint in your preferred color combinations. Alternatively, install pre-made geometric wall panels or use molding strips to form the shapes directly on the wall.
Finish with a clear sealant or matte paint for a polished look. This method allows for endless customization, making your wall a stunning centerpiece full of modern architectural flair.
2. Mirrored Panel Walls for a Luxe, Reflective Surface
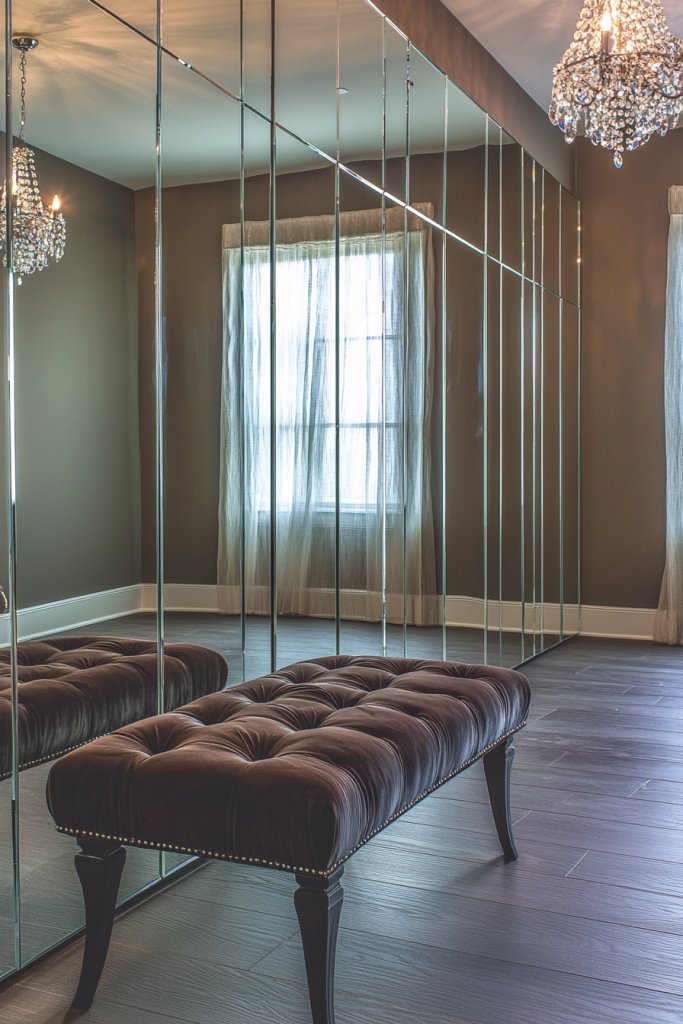
Mirrored panel walls instantly elevate your space with a glamorous, reflective surface that amplifies light and creates a sense of openness. These panels are ideal for small rooms needing a visual boost or for adding a touch of luxury to bedrooms, hallways, or bathrooms.
Visualize walking into a chic dressing area where large, beveled mirrors cover the entire wall, bouncing light from a nearby window and making the room feel twice as big. The smooth, shiny surface of the mirrors adds a sophisticated, high-end vibe, while the subtle hum of reflected sound offers a calming ambiance.
The reflective quality also highlights decor details, like a plush velvet bench or crystal chandelier, enhancing the overall aesthetic. Creating this look is simple: select large mirror panels or mirror tiles with a sturdy backing.
Secure them to your wall using specialized mirror adhesive or clips, ensuring they are level and flush. Frame the mirrors with slim metal or wood trim if desired for a polished finish.
For an easier project, opt for stick-on mirror tiles that can be arranged in a grid pattern. With minimal effort, your wall transforms into a luxe, light-reflecting focal point that brightens your entire space.
3. Two-Tone Paneling for Stylish Contrast
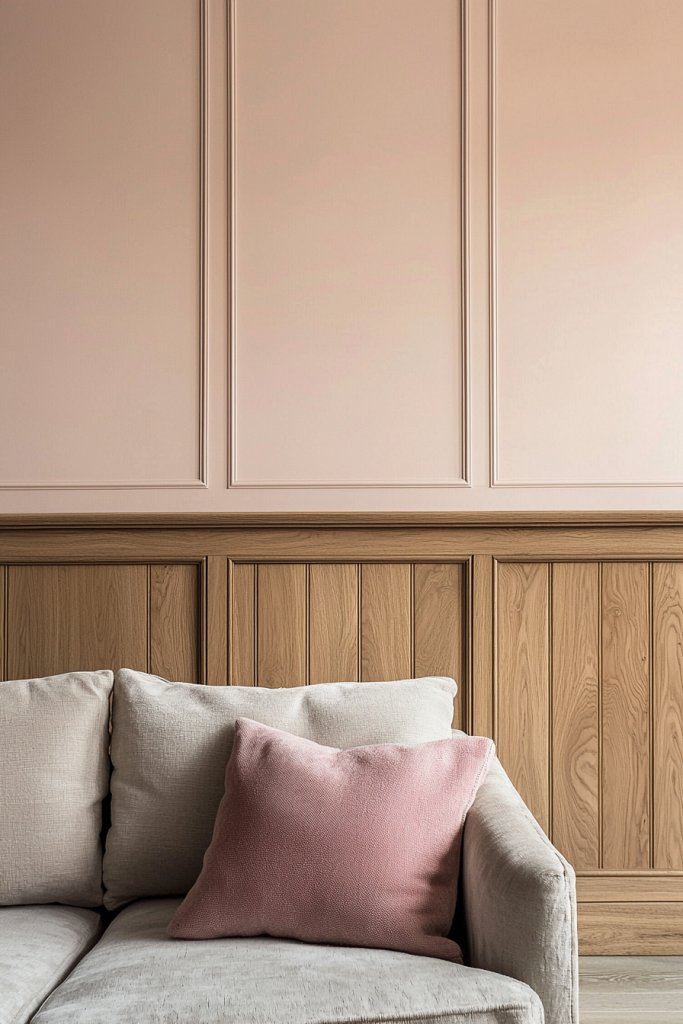
Two-tone paneling introduces visual depth and personality by combining different colors or finishes on your wall panels. This approach adds a contemporary, playful touch while still maintaining a cohesive, stylish look.
Imagine a living room where the upper half of the wall is painted a soft blush pink, while the lower half features natural oak panels. The contrast between the muted pastel and warm wood creates a lively yet harmonious environment.
The different finishes—matte paint and matte or satin wood—offer tactile variety, and the color pairing can reflect your personal style, whether bold or subtle. This technique also helps define space, such as separating a dining area from a sitting zone.
Start by measuring your wall and installing wood panels or shiplap in your chosen finish. Paint the upper section with your preferred color, using painter’s tape to create a clean division line.
Consider pairing white or pastel shades with natural wood or darker tones for a striking effect. Seal and protect your painted sections, then add hardware or decorative trim at the division line for extra polish. This simple yet impactful method allows for endless customization, making your wall a dynamic feature that reflects your style.
4. Reclaimed Wood Panels for Rustic Elegance
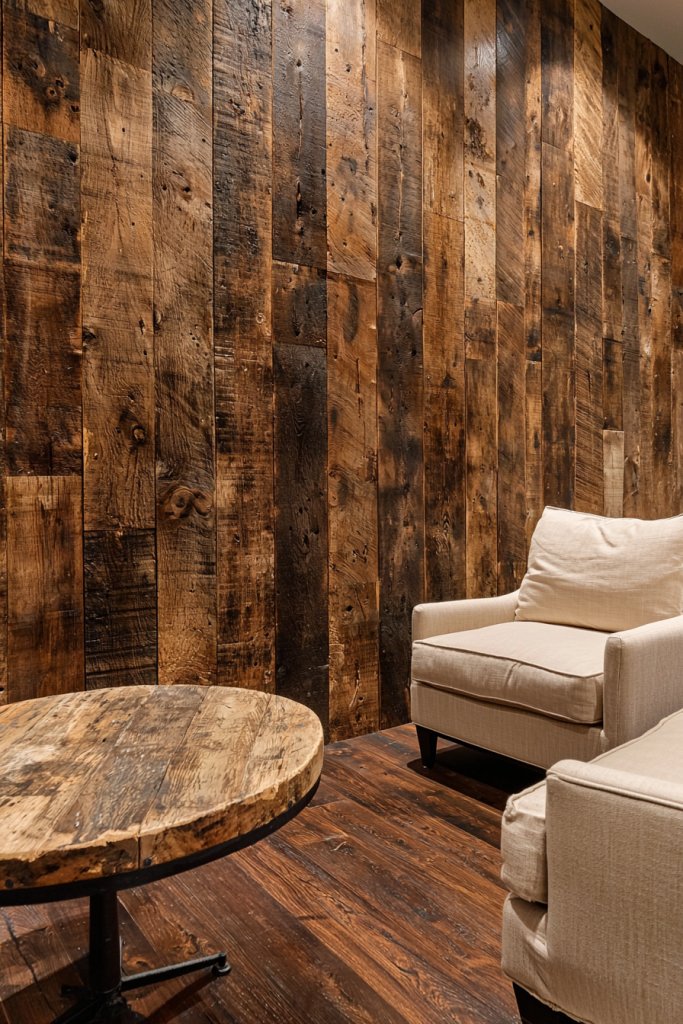
Reclaimed wood panels bring a warm, eco-friendly touch of rustic charm that instantly elevates any space. This idea is perfect for adding texture and character, blending history with modern style to create a cozy yet sophisticated ambiance.
Imagine walking into a room where the walls are clad in weathered, rich-toned wood planks with visible knots and grain patterns. The panels vary slightly in size and tone, giving an authentic, handcrafted feel.
The scent of aged wood and the tactile roughness under your fingertips evoke a sense of natural warmth. These panels can be installed horizontally, vertically, or in chevron patterns, offering versatile visual interest.
When paired with soft, neutral furnishings, reclaimed wood creates a striking contrast that emphasizes both texture and environmental consciousness. To implement this look, start by sourcing reclaimed wood from salvage yards, online suppliers, or local artisans—look for sustainably harvested options if possible.
Measure your wall space carefully and cut the wood planks accordingly. Attach them securely using nails or a hidden tongue-and-groove system for a seamless appearance.
Sand any rough edges lightly and finish with a natural oil or stain to enhance the wood’s character. For an easier approach, consider using peel-and-stick wood veneer panels, which are more budget-friendly and simpler to install for beginners.
5. Beaded Board Paneling for Vintage Appeal
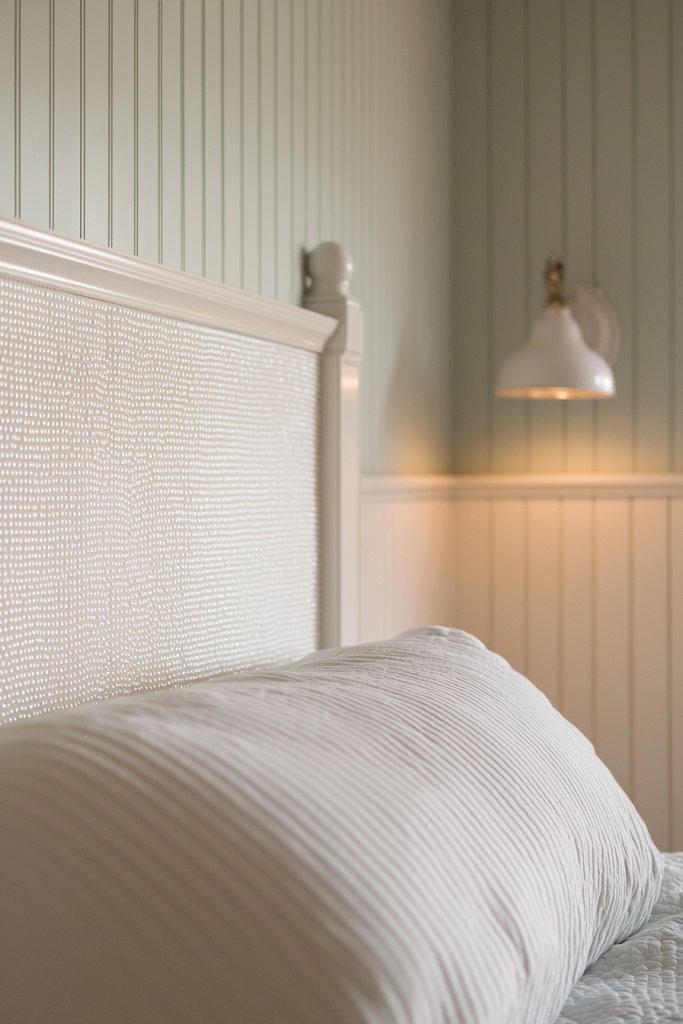
Beaded board paneling exudes vintage charm, evoking cozy cottages and timeless Americana. Its subtle bead detail adds a delicate texture that softens any room, making it ideal for bedrooms, bathrooms, or even kitchens seeking a nostalgic touch.
Picture a bedroom with soft pastel walls accented by crisp white beaded panels running halfway up the wall. The beads catch the light subtly, creating gentle shadows that add depth.
The smooth, glossy finish of the beads contrasts with matte painted surfaces, giving the room a layered, inviting feel. The overall effect is warm and charming, reminiscent of a seaside or countryside retreat, yet adaptable to contemporary decor with the right accessories.
To achieve this look, purchase pre-made beaded board panels from home improvement stores or online. Measure your wall space, then cut the panels to fit if needed.
Attach the panels using a strong adhesive or nails, ensuring they are level and flush for a polished look. Finish by painting the panels in your chosen color—classic white is timeless, but pastel shades or soft neutrals work beautifully too. For a more budget-conscious option, you can also create a faux beaded board effect by applying decorative molding strips to a painted wall, then sealing the beads with a clear topcoat.
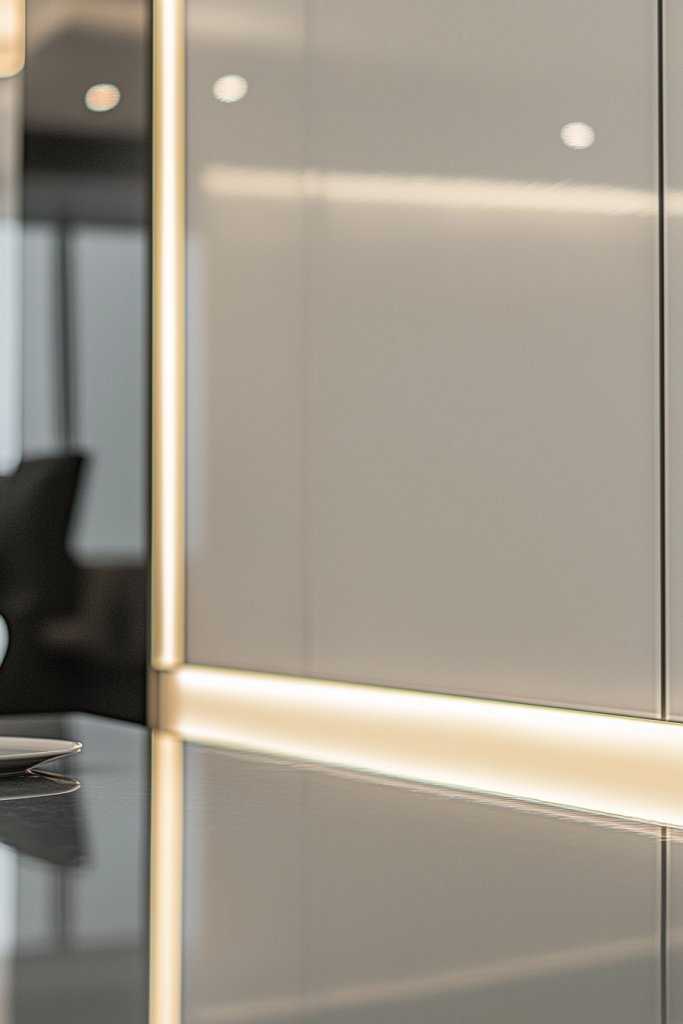
6. LED-Backlit Panel Walls for Modern Ambiance
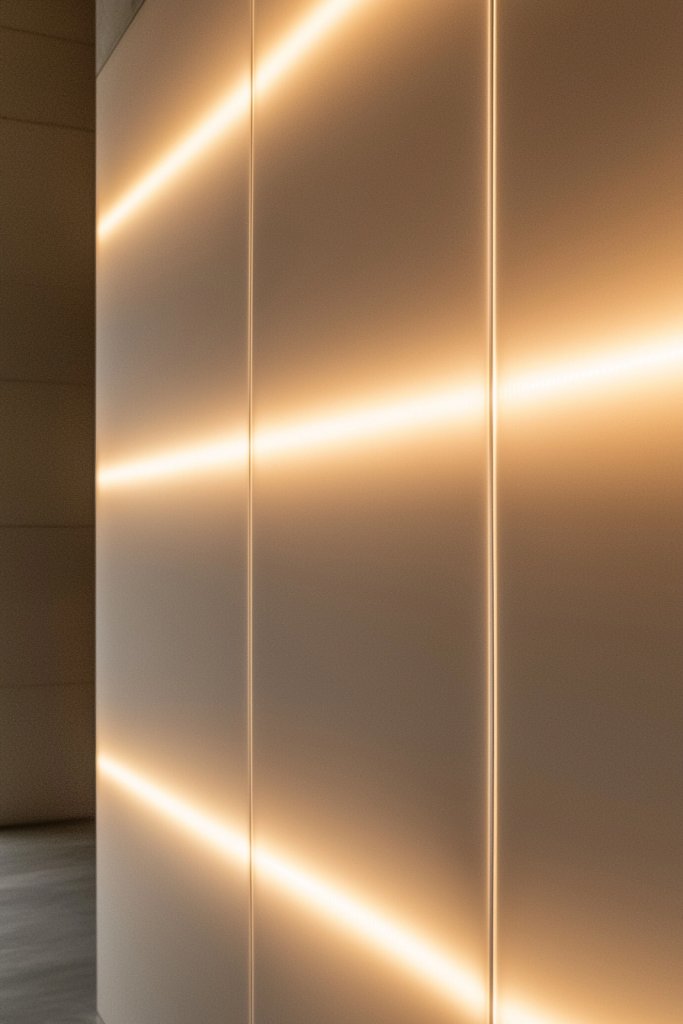
LED-backlit panels transform walls into sleek, ambient focal points that add a contemporary, high-tech vibe to any space. These illuminated panels are perfect for creating a cozy, customizable atmosphere in living rooms, bedrooms, or home offices.
Envision a wall where smooth, matte panels are subtly lit from behind by soft, adjustable LED strips. The glow is warm or cool depending on your mood—perhaps a gentle amber for relaxing evenings or crisp white for energizing mornings.
The panels themselves are frameless, with seamless surfaces that reflect the gentle light, making the room feel larger and more inviting. The glow highlights the texture of the wall, adding depth and a futuristic touch that’s perfect for modern interiors.
To set this up, start with flat, lightweight panels such as MDF or high-quality composite materials. Attach LED strip lights behind the panels using adhesive or clips, ensuring the wiring is hidden for a clean look.
Connect the strips to a dimmer switch or smart home system for adjustable brightness and color. Power sources and controllers should be discreetly placed nearby.
For an easier DIY, consider pre-lit backlit panels available from specialty retailers; these come with integrated lighting and require minimal assembly. This approach allows you to enjoy a sleek, luminous wall without extensive wiring or carpentry skills.
7. Colored Panel Walls for a Bold Statement
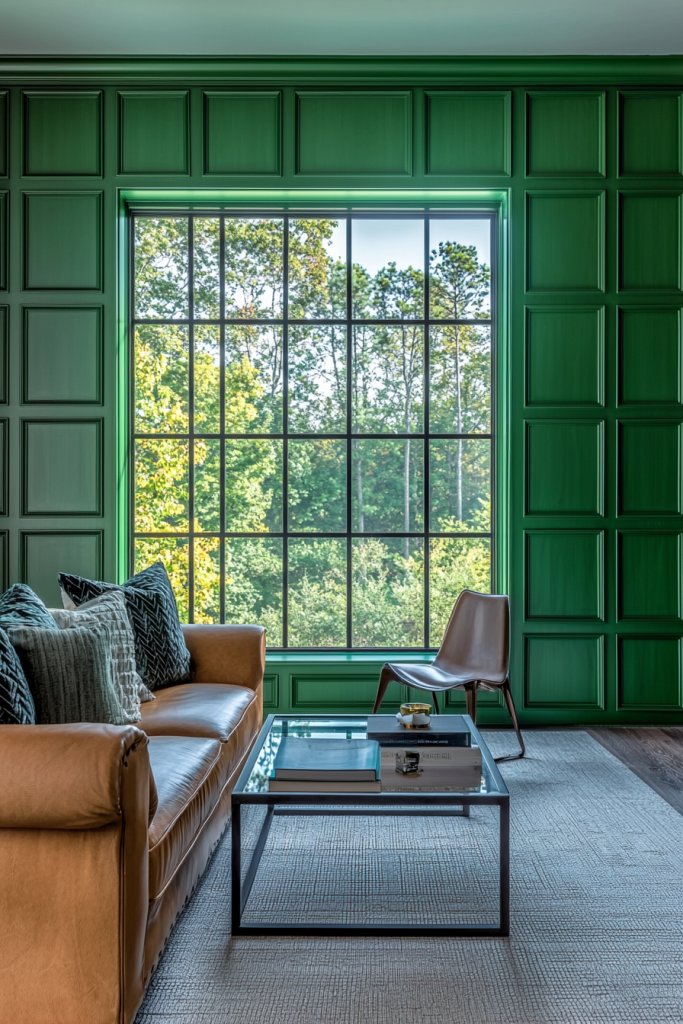
Painting panels in vibrant or pastel shades transforms ordinary walls into eye-catching features that express personality and style. Colorful panelled walls are perfect for adding a playful, modern touch or a sophisticated splash of color to any room.
Imagine a living room with deep emerald green panels framing a large window, or a nursery with soft blush pink panels that create a gentle, cheerful environment. The color choice instantly draws attention, making the wall a focal point.
The panels add structure and dimension, while the bold color injects energy or calmness, depending on your palette. The textured surface of the panels enhances the visual interest, making the space lively yet cohesive.
To create this look, choose your favorite shades of paint—consider high-quality, washable paints for durability. Use painter’s tape and a level to outline your panel sections, then carefully paint within each area.
For a more refined appearance, consider using semi-gloss or satin finishes, which are easier to clean and add subtle sheen. If you’re hesitant about bold colors, start with muted pastels or soft neutrals on individual panels to create a more subdued effect. This method is accessible for DIYers and allows endless customization to suit your personal style and space.
8. Panelled Accent Wall with Metal or Brass Accents
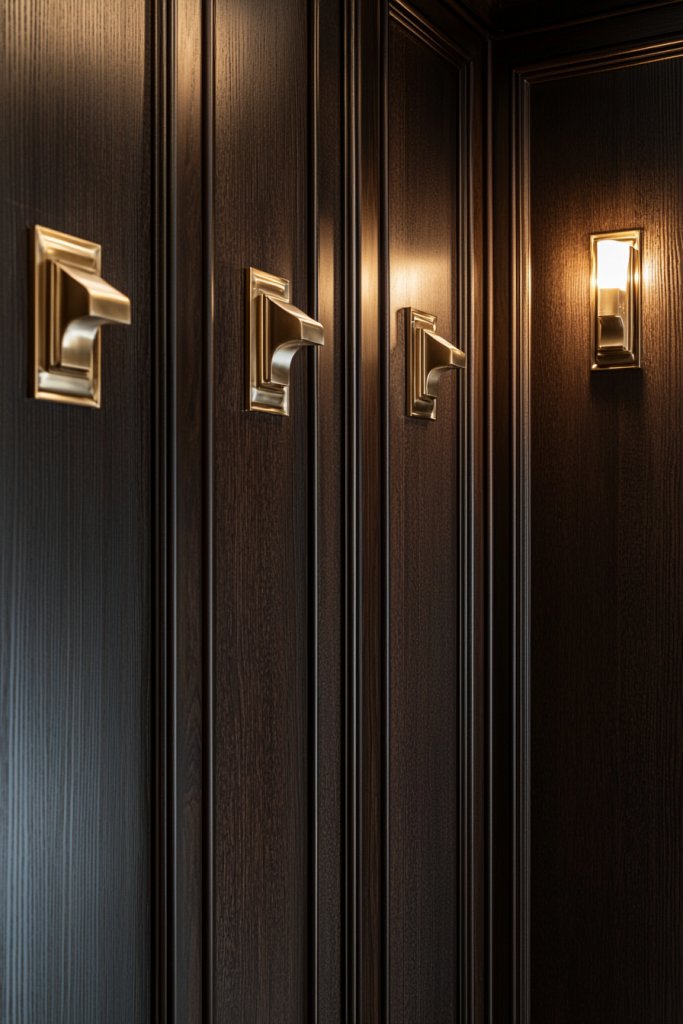
Incorporating metal or brass accents into panelled walls transforms a classic look into a chic, industrial-inspired feature. This style combines warm metallic finishes with rich wood textures, creating a balanced and modern aesthetic that feels both luxurious and edgy.
It’s perfect for adding a statement element in dining rooms, home offices, or entryways. Visualize a wall of dark-stained wood panels, arranged in a grid or vertical layout, with sleek brass or matte black hardware details such as handles, decorative trims, or corner brackets.
The metallic accents catch the light, providing a subtle shimmer that elevates the entire space. You might also add brass picture rails or decorative strips along the panel edges for a more intricate look.
The contrast between warm metal tones and natural wood creates a sophisticated, tactile surface that invites touch and admiration. This combination lends a contemporary, high-end feel that can be tailored to both minimalist and eclectic interiors.
To achieve this look, begin by selecting high-quality wood panels in your preferred stain or finish. Attach them securely to your wall with nails or adhesive.
Incorporate metallic details—like brass corner trims or hardware—either purchased pre-made or custom fabricated. Use a drill and level to ensure precise placement of accents.
For a polished finish, seal the wood with a protective coating. This design is suitable for DIYers comfortable with basic carpentry and metal hardware installation, and it instantly adds personality and style to your space.
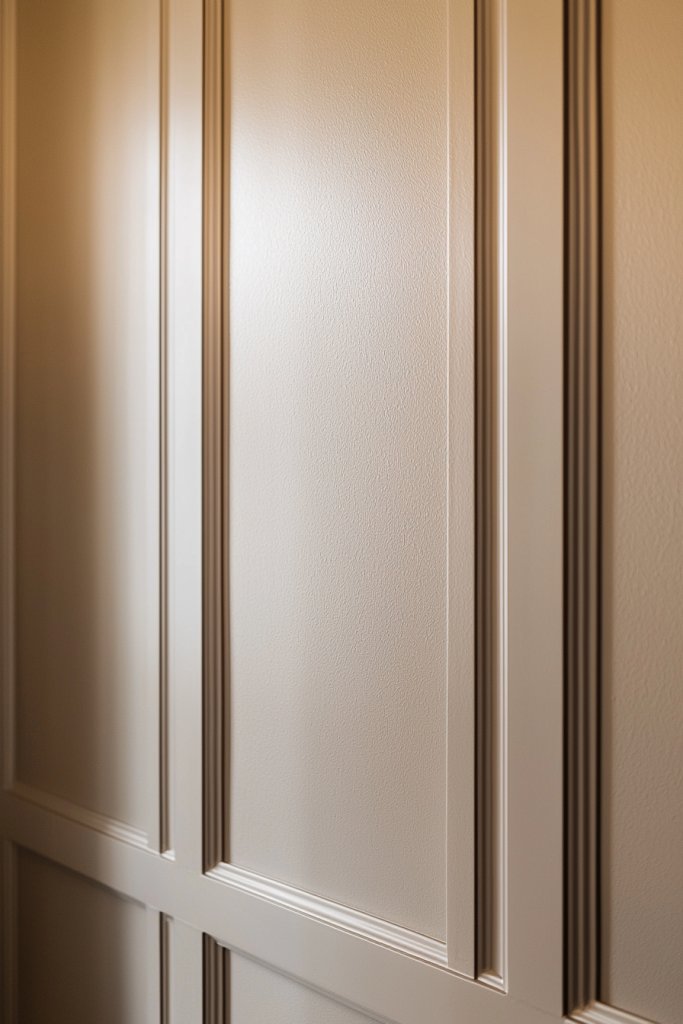
9. Frameless Flat Panel Wall for Minimalist Modernity
A frameless flat panel wall epitomizes sleek, contemporary design with its seamless, smooth surface that creates a sense of endless space. This look is ideal for modern interiors aiming for clean lines and understated elegance, often seen in living rooms, offices, or media walls.
Picture a wall covered in large, smooth panels that appear to float without visible joints or hardware. The panels are typically made from materials like high-gloss lacquered MDF, acrylic, or even textured laminate in neutral shades such as white, black, or soft grey.
The absence of framing emphasizes the flatness and simplicity, making the wall feel expansive and unobtrusive. Lighting plays a crucial role—recessed LED strips or spotlights can highlight the subtle contours and add depth.
The overall effect is a sophisticated, minimalist backdrop that complements sleek furniture and modern decor, emphasizing form and function. To implement this, measure your wall carefully and select panels large enough to minimize seams.
Use specialized adhesive or mounting systems designed for flat-panel installation, ensuring the panels are perfectly aligned and securely fixed. Consider installing LED backlighting for added ambiance.
Keep the surface clean and free of clutter to maintain the minimalist aesthetic. This approach is accessible for DIYers with some experience in wall finishing and offers an impressive, high-end look with relatively straightforward materials and techniques.
10. Multi-Panel Wall with Built-in Shelves or Niches
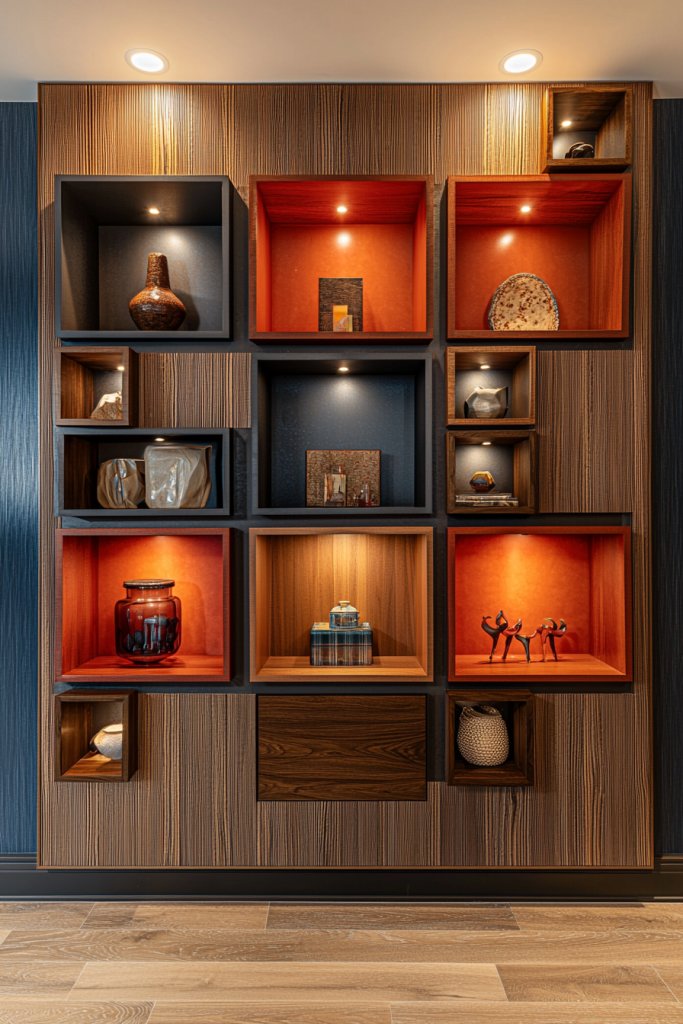
Creating a multi-panel wall with built-in shelves or niches combines functional storage with aesthetic appeal, offering a dynamic way to display decor and organize your space. This design is especially popular in living rooms or home offices where personalization and practicality go hand in hand.
Visualize a series of rectangular panels arranged in a grid or staggered pattern, with selected sections featuring recessed shelves or niches. These recessed spaces can be fitted with floating shelves, cubbies, or custom cabinetry, perfect for displaying books, sculptures, or decorative objects.
The panels themselves can be painted in a contrasting color, textured, or stained wood, adding visual interest. The combination of open storage and closed panel sections creates a layered, architectural effect that feels both modern and inviting.
LED lighting within the niches can further highlight your favorite pieces, making the wall a focal point. To build this feature, start by planning your layout—mark the wall with painter’s tape and use a level for precision.
Install the panels with appropriate fasteners, ensuring they are securely anchored. For the shelves or niches, use sturdy brackets or custom-built units, and finish with paint, stain, or wallpaper to match your design theme. This project is suitable for DIY enthusiasts with basic carpentry skills and provides a versatile, personalized backdrop that enhances both form and function in your home.
11. Patterned Paneling with Carved or Laser-Cut Designs
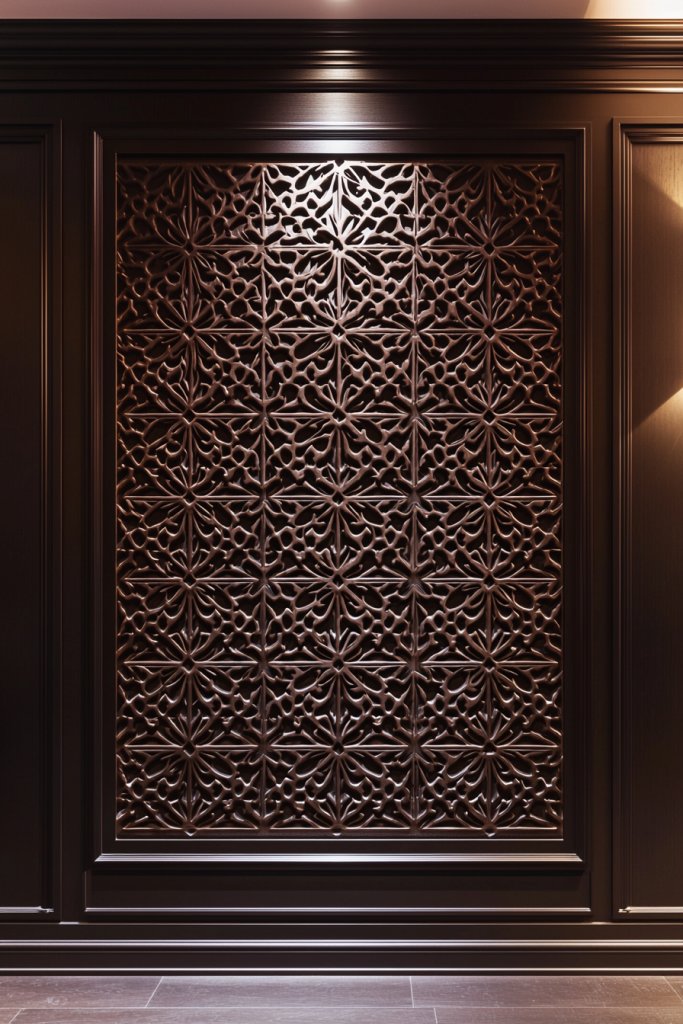
Patterned paneling featuring carved or laser-cut designs introduces a decorative and artistic element to your walls, transforming plain surfaces into focal points. This approach is perfect for adding intricate detail and craftsmanship to spaces like dining rooms, entryways, or feature walls in bedrooms.
Imagine panels made from MDF, plywood, or lightweight wood, with elaborate patterns cut out—think floral motifs, geometric shapes, or abstract designs—created either by hand carving or laser cutting. The panels might be painted in bold colors like navy or emerald for a dramatic effect, or kept in natural wood tones for a warm, textured appearance.
When installed, the intricately patterned panels cast shadows and add visual complexity, creating a mesmerizing interplay of light and dark. The detailed designs serve as a statement piece that elevates the overall aesthetic of the room.
To create these panels, select a design that complements your space, then have the patterns cut by a laser-cutting service or use a DIY stencil and carving tools if you’re experienced. Attach the panels to your wall with adhesive or nails, ensuring the patterns align seamlessly.
Finish with paint, stain, or clear sealant to enhance durability. This project is suitable for intermediate DIYers interested in craftsmanship and results in a truly unique, artistic wall feature that sparks conversation and admiration.
12. Faux Paneling with Textured Wall Paint Techniques
Transforming your walls into stunning panelled surfaces without the need for actual wood or molding is easier than you might think, thanks to textured wall paint techniques. This approach offers the look of traditional paneling with a modern, budget-friendly twist, making it perfect for renters or anyone looking to add depth without major renovations.
Imagine a wall that mimics the elegant lines of classic panels, but with a contemporary flair. You might start with a neutral base color—like soft beige or icy gray—and then use a stencil or painter’s tape to create rectangular or square shapes.
Applying textured paint or using a sponge to dab on layers of contrasting shades creates a tactile, three-dimensional effect. The textured paint can have a subtle matte finish, giving a sophisticated, understated look, or a slight sheen to catch the light.
The result feels both polished and cozy, adding warmth and visual interest to any room. As you run your hand along the surface, you’ll notice the gentle ridges and valleys that give the illusion of actual paneling, but with far less effort and expense.
Getting this look is straightforward. Start by preparing your wall with a clean, smooth coat of primer if needed.
Use painter’s tape to outline your desired panel shapes—rectangles, squares, or even more intricate patterns. Choose textured wall paints or create your own by mixing sand or fine grit into regular wall paint.
Carefully apply these within your taped sections using a sponge, brush, or roller, blending the edges for a seamless appearance. For added dimension, you can layer different shades or add a light glaze.
Finish with a clear matte or semi-gloss sealer to protect your design. This DIY technique offers a customizable, stylish alternative to real paneling that’s perfect for refreshes or quick upgrades.
13. Modular Panel Systems for Customizable Layouts
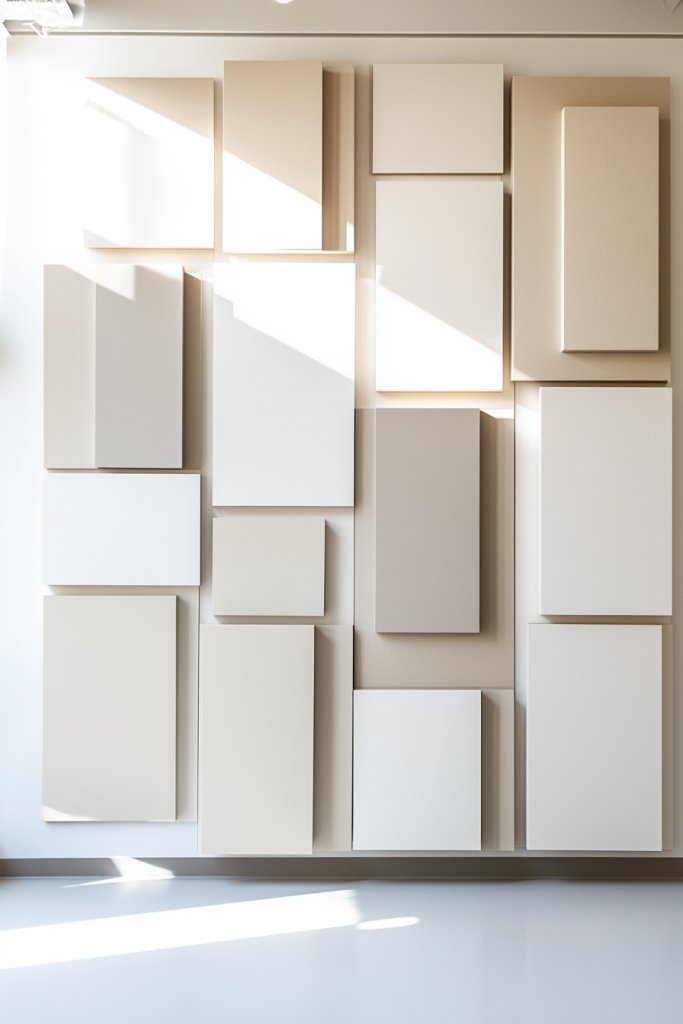
Modular panel systems are a game-changer for anyone seeking flexibility in their home decor. These versatile, easy-to-rearrange panels allow you to craft unique wall designs that can evolve with your style or needs, making your space endlessly adaptable.
Picture a sleek grid or organic arrangement of panels in various sizes and finishes—think matte black, warm wood tones, or even fabric-covered options. These panels clip together seamlessly, often with hidden hardware or magnetic edges, creating a clean, modern look.
You can design a bold geometric pattern for a statement wall or keep it simple with a linear layout. The beauty of modular systems is that they can be easily added to, removed, or reconfigured, giving you full control over your space.
Whether you want a subtle textural backdrop in the living room or a dramatic feature in the bedroom, this approach supports ongoing creativity. Plus, many systems include integrated shelving or built-in lighting options, adding both function and style.
Implementation is straightforward. Start by measuring your wall area and selecting a modular panel system that suits your space and aesthetic.
Most systems come with detailed instructions, but generally, you’ll mount the panels to the wall using screws or clips, ensuring they are level and secure. You can choose from materials like MDF, PVC, or lightweight wood composites—many of which are affordable and easy to work with.
For a quick refresh, swap out panels or change their arrangement whenever you desire a new look. To personalize further, add decorative elements like textured fabrics, metallic accents, or LED backlighting. This flexible setup makes updating your decor simple, fun, and highly customizable.
Conclusion
With so many creative panelled wall ideas—from classic shiplap and vintage beaded board to modern LED-backlit and textured wallpaper insets—there’s a perfect style to elevate any home. These versatile options allow you to add texture, color, and personality, transforming ordinary walls into stunning focal points.
Don’t hesitate to experiment and incorporate these designs into your space—your home’s style is waiting for your personal touch. Unleash your creativity and make a bold statement with panelled walls that truly reflect your unique aesthetic.
Leave a Reply